
25 tips to improve your printed products
The results you can achieve in printing depend on a number elements and specific advice may vary depending on the product you are looking to produce. Here is a list of things you can do to ensure your product is print ready.
Document set up
Software
- Choose the right program for your document or project. We recommend the Adobe Creative Suite.
- Adobe InDesign is a desktop publishing program used to create documents such as books, magazines, brochures, posters and flyers. It is great for multi page layouts combining text and images.
- Adobe Photoshop is for creating and editing photos and raster/pixel based artwork.
- Adobe Illustrator is graphically driven software used for creating and editing vector images for illustrations like logos, graphics, and cartoons.
Size and trimming
- The trim edge is the edge of the final printed product. Make sure you set up your document correctly by using the correct size. Set the size of the document to be the exact size of the finished, printed product.
- Where you require printing to the edge of the page, you will need to add bleed to your artwork. Add at least 3 mm to the edge of each side of your artwork. Then, ensure the colours or graphics continue into this space. This adds a total of 6 mm to the overall dimensions of the artwork page size, which will be cut off during the production process.
- Consider how close you position text and images to the edge of the page or fold lines. We recommend applying a safe edge of 5 mm as a minimum to ensure that no text is cut off due to variation in the trimming process.
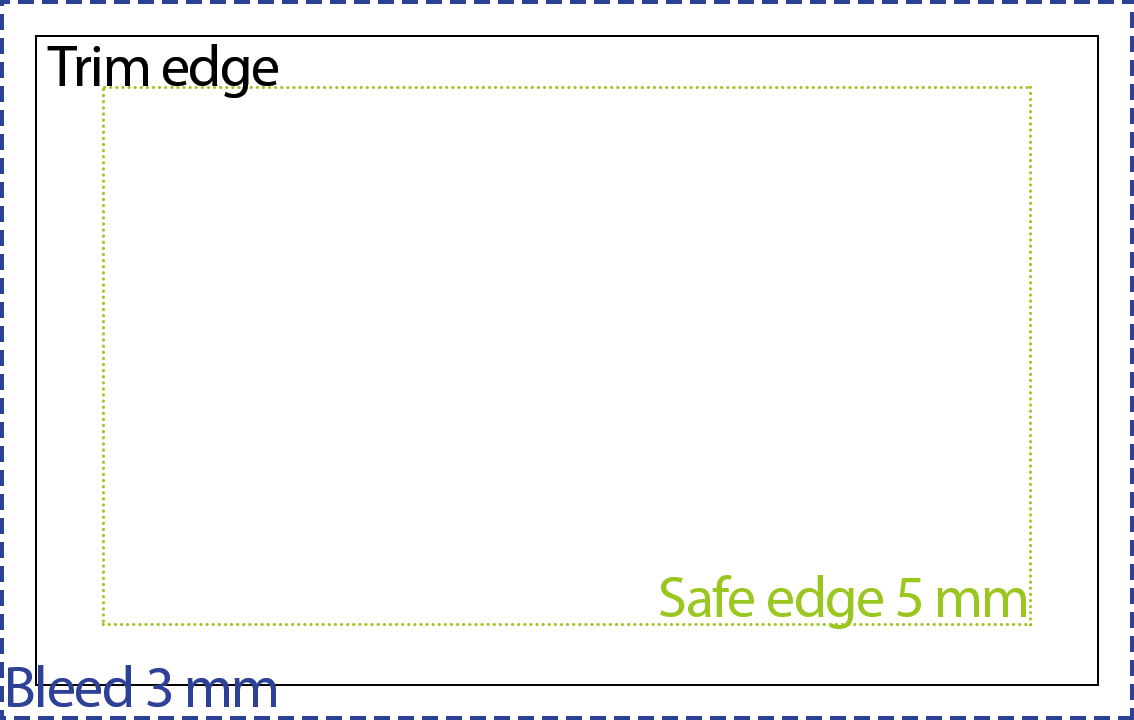
Bleed, trim and safe edge guidelines
Images and colour
Images
- Ensure the resolution for all image files are at least 300 dpi and are size appropriate for the dimensions of your artwork.
- Place your 300 dpi image at no larger than 100% in your document. Size and resolution are relative, so increasing the size will result in a lower resolution image.
- Vector images, such as logos aren’t dependent on resolution, and can generally be resized without the quality deteriorating in print.
- Vector artwork should be saved as an AI, EPS or PDF file.
- For other images, use TIFF or PSD files in your artwork as you don’t lose any quality by saving as a TIFF or PSD.
- A very high quality JPEG is similar to a TIFF or PSD file. Saving an image as a JPEG can remove detail, but if your image is JPEG, there is no need to convert to a TIFF or PSD file, as it won’t recreate lost detail.
- Images placed at the edge of the artwork should be extended beyond the page into the bleed edge.
- Remember to get permission to reproduce images that don’t belong to you. Try to use original images or purchase stock photos.
Colour
- Use CMYK colour mode or profile when preparing images and artwork. This is important, RGB is for screens and printed and converted colours can be unpredictable.
- Due to differences in screen quality and print, the colours you see on your screen may not match the printed result. Work with your printer to make sure colours turn out the way you want them to.
Fonts
- When submitting PDF files, be sure to embed all fonts. Embedding the fonts makes sure nothing is lost when the document is printed. The best way to do this is to package your job when saving the file.

Package your file in InDesign to embed fonts for print ready documents.
- Another way is to convert text to curves or paths to ensure the type face is not lost during the printing process. If you do convert to paths, be sure to keep a saved copy of the original file, just in case you need to edit the document later.
Saving
File formats
- As a rule, send print ready PDFs or files saved in the format native to the program such as INDD, AI or PSD for Adobe Creative Suite files.
- It is ideal to package your files for printing. For example, InDesign will create a folder with: the native file (INDD), an included fonts folder, a links folder containing all the linked images, and a PDF.
- Make sure the package summary lists each image under the CMYK profile with a linked status. Linked image files are preferred to embedded images as it saves disk space. If any of the images are missing, be sure to relink them before packaging.
Print ready PDF
- If you are supplying a print ready PDF, ensure your PDF is centred and contains crop marks. These marks let the print finisher know where to trim your job.
- Be sure to embed fonts, check images are at least 300 dpi and set to CMYK colour profile.
- When creating a PDF from InDesign, use the high quality print pre-set.
If you don’t have the software to prepare your documents, inteliprint has an experienced team that can help you get print ready. We are dedicated to understanding the needs of our customers so we can help and guide them through the printing process. We take the time to work through the initial concept and help our customers make informed choices and achieve excellent results in design, print and promotional media.
Ask us how we can help
Contact us today and we will answer your questions on your printing needs. We're here to make it easy for you.